


I was one day listening to a audiobook written by Larry Correia called Monster Hunter Alpha, which I highly recommend. I really came to love the protagonist of the story, Earl Harbinger. Earl was acting as the unofficial head of MHI because his grandson was too old to keep up. Yes, that's right, Earl ages about 10 times slower due to the fact that he was infected nearly a century ago with lycanthropy. In layman's terms, he's a werewolf, a loup garou. And not just any werewolf. Due to a life altering sabbatical/self imposed exile just after he was infected, Earl gained a modicum of control (except on a full moon) and defeated all challengers to become the Alpha, King of all Werewolves. Earl tends to give his infected subjects wide berth as long as they don't start killing people or irritate the king.
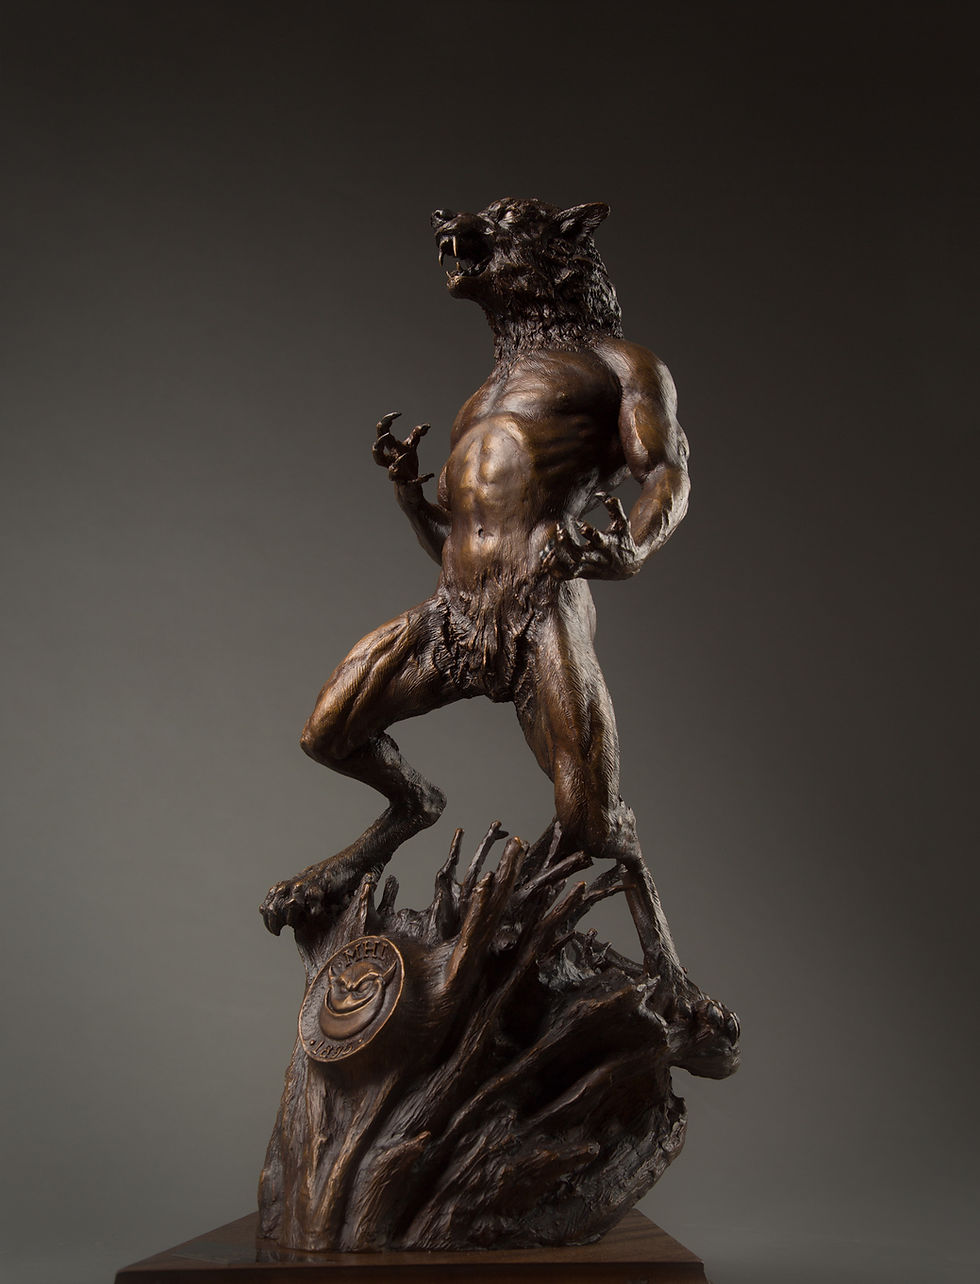
While thoroughly enjoying the only MHI book so far where Earl is the protagonist, I decided I had to pay tribute to the king of werewolves. So I began a sculpture depicting Earl during of one of his transformations. Being fully rested and having plenty of protein in his diet, he is a little bulked up and has great muscle definition. He is depicted mid way through the transformation, so his head has already morphed into full-on wolf form, and he has grown black claws, a tail, and sprouted fine hair all over his body. I made the hair thicker around his neck and in his groin for modesty. His legs have mutated into a hybrid of wolf and human legs, so he'd be great at sprinting and leaping. Exactly how far Earl is into his transformation is a matter of personal preference and interpretation. To be accurate with the book, I'd imagine his fully transformed figure would have more hair, and longer claws.
While thoroughly enjoying the only MHI book so far where Earl is the protagonist, I decided I had to pay tribute to the king of werewolves. So I began a sculpture depicting Earl during of one of his transformations. Being fully rested and having plenty of protein in his diet, he is a little bulked up and has great muscle definition. He is depicted mid way through the transformation, so his head has already morphed into full-on wolf form, and he has grown black claws, a tail, and sprouted fine hair all over his body. I made the hair thicker around his neck and in his groin for modesty. His legs have mutated into a hybrid of wolf and human legs, so he'd be great at sprinting and leaping. Exactly how far Earl is into his transformation is a matter of personal preference and interpretation. To be accurate with the book, I'd imagine his fully transformed figure would have more hair, and longer claws.
When doing a sculpture of a hybrid creature, the art is in your decision of where to draw the line between the two forms and in designing a form that looks natural in the blending of the two. I wanted to show off an awe inspiring male physique while definitely depicting a monstrous form that you would only want to meet in your worst nightmare. The decision to make the full wolf head was based on the animalistic nature of the fully transformed werewolf and Larry's clear description of a long snout bristling with razor sharp teeth. The decision to make the torso more human was based the clear weapon of choice of werewolves in Larry's books, their claws. I felt that hands with dagger like claws would be much more deadly with a more human shoulder and torso giving a larger range of movement.
I love bronze sculpture because of the beauty of the metals and patina, and the durability of the sculpture. Although the patina can be scratched a bit, it's almost impossible to damage a bronze sculpture unintentionally. This sculpt was complex enough that it would have to be molded in parts and then welded together. Resin pieces can be glued, but they would be much more fragile and for a sculpt like this, would be difficult to ship. I'm currently exploring other casting materials that might prove rugged and strong enough for this sculpt. Until then, only the bronze will be available.
Why is bronze sculpture so expensive? Those who are not familiar with the process might assume the large price tag is to cover the large ego of the artist, but that is rarely the case. The reason it is so expensive is because of the incredible amount of labor that goes into crafting each one.
From Clay to Bronze
I'll go through the steps to create one of these pieces one by one so that you can fully appreciate the work that goes into a lost wax bronze casting of Harbinger. As you'll see, there are many people involved that use expensive and at times, dangerous equipment. You may click on the images below for a larger view and description. This is a work in progress, so I'll finish describing it and post photos as they come in.
Step 1: Temporary Base, Backiron and Armature


The first step in any sculpture is to find a working base and construct some armature. The working base is usually made from melamine coated plywood. The backiron is usually just iron pipe with fittings that puts together the larger supporting structure. The armature itself is made from aluminum wire. Why aluminum? Aluminum is fairly flexible, yet holds it shape unless you force it. And you can bend it over and over again and it will never break.
Step 2: Roughing In the Form
After the armature is ready to go, the clay is heated and applied warm to speed up the initial buildup of clay. At this stage, I try to make all the major design and compositional decisions. Sometimes, I do some detail just so I can get a better idea of what the finished piece with look like, but frequently that detail is lost as compositional changes are made. I also took a first draft of the MHI amulet for the base. It was actually much more difficult than I expected to do a line art version, so I elected to do a 3D version instead. You might notice here that the first head for Earl was a quick mockup of a human head. Later I abandoned that head after I did a quick wolf head test and liked it much better.


Step 3: Detailing the Form
The devil is in the details. I sometimes spend several hundred hours detailing a sculpture. Many commercial sculptors take great pride in knowing what to finish with a high degree of detail, and what to leave rough. I sometimes feel like I'm not a real sculptor because I detail everything. At the conclusion of every project, the sculpture might not be perfect, but it represents the best that I can do at that time. So I'm proud of it. They say that art is never completed, only abandoned. I have found that to be true.


Step 4: Flexible Silicone Mold
After the clay sculpture is complete, it is ready to be molded. The first step in molding is to apply a flexible silicone rubber mold to capture all the details. During this stage, the strategy for molding is agreed upon and if the sculpture needs to be cut apart, it is done here. Molding a clay sculpture typically ruins it, so for this reason most sculptors contract this out to someone who does it for a living. If you have one shot to get it right, you make the most of it.


Step 5: Rigid Plaster Mold
The flexible rubber mold is too "bendy" to facilitate a proper cast, so it needs a rigid support structure to hold the general form. Plaster is mixed with fiberglass for reinforcement and applied to the silicone rubber mold to make a mother mold. The two molds together are capable of reproducing the general form and fine detail of the sculpture.


Step 6: Wax Casting
Molten bronze is over 2200 degrees Fahrenheit, and would melt the silicone mold instantly. For this reason, we need to make a one-time use ceramic mold that can take the heat. Bronze sculptures are typically not solid. Not only is the bronze metal expensive, it is heavy. So a wax casting is made first by pouring in wax and swirling it around and dumping it out over and over again until the sculpture is between 1/8 inch and 1/4 inch thick. This will be the final thickness of the bronze.


Step 7: Preparing for the Ceramic Mold
In order to take a wax casting and prepare it for the ceramic slurry molding, you must first clean it up and fix any blemishes that may have arisen during the wax casting process. This is called wax chasing. Sometimes parts that were molded separately can be joined together in wax, and sometimes parts that were cast intact must be cut into or broken apart in order for the ceramic mold to work properly. After that, wax rods called sprues must be attached to form the channels that the molten bronze will flow through during the bronze casting phase.


Step 8: Ceramic Slurry Molding
The sculpture is dipped into a ceramic slurry to create a hard, durable shell. This shell will serve as the mold for the molten bronze once the wax has been melted out. The first slurry is very fine and capable of accepting all the detail captured in the wax. It is then coated several more times in progressively coarser and thicker slurry producing a mold strong enough for casting.


Step 9: Preheating the Mold/Melting the Wax
The finished molds are then placed in a high pressure oven called an autoclave. There the high temperature and pressure melts the wax. At over 1800 degrees, any wax that might be trapped in the mold is incinerated. Now that the wax is gone or "lost", the mold bakes in the heat ant pressure and is fully prepared for bronze casting.

Step 10: Bronze Casting
Silicon Bronze is heated to about 2250 degrees Fahrenheit. At that temperature, the molten bronze is hot enough for its radiant heat to melt hair and burn skin, so protective gear must be worn.


Step 11: Chipping/Demolding
The ceramic mold often cracks and begins to fall off in chunks as the bronze cools. However, sometimes it is difficult to remove. A small pneumatic hammer can chip away the ceramic mold without damaging the bronze beneath. Sometimes a sandblaster is used to wear away tiny pieces of the mold that gets stuck in the crevices. Sometimes tiny bits of the ceramic investment is left in areas, like inside the hollow sculpture, where it won't be seen.


Step 12: Metal Chasing/Welding the Parts Together
During metal chasing, the technician will weld together all the pieces and blend in the weld seams using metal tools. He'll also fix any defects in the metal like bubbles or seam marks. Metal sprues will be cut off with a plasma torch and be ground down.


Step 13: Sandblasting
The piece will get a final sandblasting to make sure all the surfaces are free from defects or discoloration. Walnut shells are frequently used as they are hard enough to just barely abrade the surface but not in any material way. It takes off the outer layer of bronze, but won't disfigure the sculpture in any way.


Step 14: Patina
You patina a bronze sculpture by causing its surface to react to chemicals and oxidation. In this case we spray on potash (liver of sulfur or sulfurated potash). This will cause the metal to turn a dingy gray. If it is applied heavy enough, it can help turn the sculpture black. After the potash is applied it is carefully scrubbed back using a mildly abrasive pad. This leaves it darker in the recesses and lighter on the surface. Then the sculpture is heated up to 220 degrees Fahrenheit, and then ferric (ferric nitrate) is applied while hot. This adds a red color to the bronze. The ferric and the potash together will produce colors ranging from gold, orange, brown, and a rich black.


Step 15: Waxing/Sealing
After patina, you typically spray the sculpture down with a sealer. I like flat sealers because I don't like how shiny the sculpture becomes when you spray a gloss or even a semi-gloss. After that, I typically apply paste wax or museum wax (the same thing). It adds a small bit of protection and mutes the reflective quality a bit more. If there needs to be a bit of color added, I'll use a colored wax that hardens on permanently.
Step 16: Mounting to a Base
Choosing a base can be tricky. Mounting the sculpture on the base can be trickier still. In this case I designed the base and had a professional carpenter make it. It turned out great. The African Mahogany ended up being a great choice. The wood grain shines a bit from one direction.
How to Buy
I'm doing a limited edition of 10 castings. I'm keeping one, Larry has purchased one, so that leaves 8 more available for purchase. I'm selling Harbinger for $2850 so that I can be compensated for my time. That includes the African Mahogany base, but not sales tax and shipping. That is extra.
If you would like one of these, please email me at devondorrity@gmail.com. We'll get everything squared away from there. Thank you for your interest.